What Is Blown Plaster And How To Fix It
Plaster can enhance the durability of your walls whilst lending a touch of elegance and beauty. However, to keep your walls in good condition, it’s important to keep an eye out for potential signs of damage. Chief among these is blown plaster.
Here you will learn about what blown plaster is, the common causes, and how to fix it. Read on to find out more.
What Is Blown Plaster?
In a nutshell, plaster blows when it loses adhesion to the surface to which it has been applied. Blown plaster often looks like a bubble or bulge at first, which then cracks and flakes away.
Although the two are sometimes mistaken for the same thing, there is an important difference between blown plaster and plaster cracks. Cracks in plaster tend to be quite obvious and can quickly become a cause of concern, if they are large, but the plaster either side of the crack stays attached to the wall. Beyond clear damage such as loose patches, blown plaster isn’t always so easy to spot.
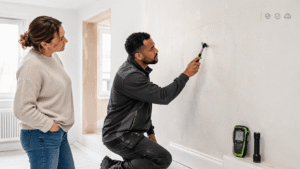
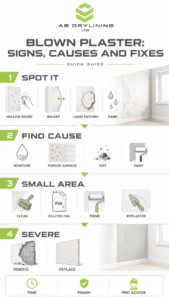
A good way to establish whether your plaster has blown is to simply knock along your wall. If you notice hollow-sounding patches, your plaster may have blown. Healthy-sounding plaster, on the other hand, will sound solid. Whilst there is a good chance that there is nothing to worry about, you may want to consider fixing blown plaster, even if it’s just for aesthetic purposes.
The Signs Of Blown Plaster
It’s important to know the common telltale signs of blown plaster, including:
- Loose patches
- Hollow-sounding areas
- Bulges
- Damp patches
- Other signs of structural damage
Being able to spot the early signs of blown plaster will help you reduce any further damage.
The Causes Of Blown Plaster
Almost every plaster problem has a diagnosis. Here are the reasons why your plaster may blow.
1. Damp and Moisture
Unsurprisingly, penetrating or rising damp from the wall behind can cause plaster to blow. This is because the moisture interferes with the adhesion process and prevents the plaster from bonding to the surface. For this reason, it is important to make sure that you apply the plaster to a clean, dry surface.
Remember, simply replastering or painting over damp walls only treats the symptoms and not the cause. In such cases, the problem will likely persist. So, it’s wise to ensure the wall is completely dry before starting any repairs.
2. Porous Surfaces
At first glance, a porous wall seems like the perfect surface for applying plaster. However, the reality is that porous surfaces can dry out very quickly, making it difficult for the plaster to grip the surface. The reason for this is that the moisture evaporates before a chemical reaction can take place, ultimately causing the plaster to blow.
3. Other Difficult Surfaces
It’s important to choose a surface that is designed to hold plaster. For example, you will find it tricky to get the plaster to stick to a tile surface. And, even if you do, the plaster will likely blow at some point
or another. Therefore, it is usually better to take the tiles off before plastering your wall to get the result you’re looking for.
4. Dirt and Grime
Dirt and dust can prevent the plaster from gripping the surface. With this in mind, it’s a good idea to wipe your surface down before applying the plaster.
For more information, read our step-by-step guide on plastering walls.
5. Paint
Blowing can also occur when painting plaster. To avoid this after your blown plaster repair is complete:
- Wait for new plaster to dry: how long plaster takes to dry depends on conditions in the space, so be certain not to paint it too soon.
- Prepare a repaired plaster wall for painting properly by sanding it well and
- It’s advisable to use a mist coat, rather than applying thick paint directly to new plaster. A mist coat is a diluted coat of paint that seals the plaster and protects it from moisture.
Expert Tip: Check The Moisture Source Before Fixing Blown Plaster
One of the most common reasons blown plaster comes back is that the repair was sound, but the diagnosis was not. If plaster is losing adhesion because moisture is still moving through the structure, a cosmetic skim or patch repair will rarely last.
Before removing loose areas, it is worth assessing where the moisture is coming from, and whether the wall is dealing with rising damp, penetrating damp, condensation or a mix of issues. Condensation is especially easy to misread because the plaster may feel dry at certain times of day, while still being exposed to repeated moisture cycles from daily activities. Cooking, showering and drying laundry indoors all create significant moisture, which can affect walls if ventilation and heating systems aren’t used well.
What Type of Damp Is Causing Blown Plaster?
- Blown plaster low down on a ground floor wall may suggest rising damp or salts.
- Damage near chimney breasts, window reveals or external corners may point to cold spots, leaks or rain penetration.
- Hollow patches that appear alongside mould, peeling paint or recurring staining deserve a slower approach.
In all cases, we recommend you improve airflow in the area, let the wall dry, and inspect gutters and external pointing, before deciding how much plaster needs to come off.
On older properties with lime-based finishes, broad removal can be the wrong move. Historic England notes that old lime plaster often hardens again once conditions improve, and that localised repair with compatible materials is often preferable to wholesale replacement. That makes diagnosis just as important as repair technique, especially in period homes.
How To Fix Blown Plaster: Step-By-Step Guide
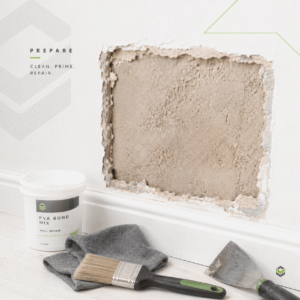
It’s fair to say that it’s pretty easy to fix cracks in plaster walls. The good news is that if you’re lucky enough to only have a small section of blown plaster, you can easily fix it using a skim coat of PVA.
1. Clean The Surface
Firstly, you will need to wipe down the area you’re working on with a damp cloth to ensure it is free from dirt and grime.
2. Prepare The Mix
Once you have cleaned the section, you will need to create a mix consisting of three parts water and one part PVA.
3. Apply The Mix
Next, you will need to prime the surface, painting on the first layer of the mix using a roller or paintbrush. Then leave it to dry.
4. Paint On The Second Coat
Once the first coat is dry, you can apply a second coat of the mix.
5. Prime The Surface
If the solution feels tacky, you can apply a primer and replaster. If it dries too quickly, there’s no need to worry. Simply reapply another coat of the diluted PVA mix. When it starts to get tacky, the area is ready to be replastered.
Fixing Severely Blown Plaster
If your plaster is severely blown, however, the above method may not be ideal. Instead, it is advisable to tear away the plaster and start over. In fact, in most cases, it is extremely difficult to fix blown plaster without tearing out the plaster and replacing it.
While it is possible to plaster your wall yourself, we understand how challenging and time-consuming this can be, especially if you’re replastering an entire room. For this reason, it’s recommended to seek the services of a professional who can help you understand the cause of your blown plaster, before handling the task with ease and doing the job to a professional standard.
If you’re concerned about blown plaster, AB Drylining’s team of expert plasterers can help you diagnose the problem and understand the best repair solution. With our plastering and rendering services, we can work on renovation projects across Wiltshire and the South West, including Bristol, Swindon, Bath and the West Midlands. To speak to a member of our team, simply give us a call on 01225 941006 or submit an online enquiry.